A Docker volume permits data to be stored in a container outside of the boot volume but within the root file system. In our previous posts we have launched containers from various images and even deployed few applications using Docker images. Here, we will take a look at Docker Volumes. With Docker Volumes, we are essentially going to look at how to manage data within your Docker containers. The data in any volume can be freely browsed and edited by the host operating system, and standard Unix permissions apply. As the data is stored in a standard file system, it can be backed up, copied or moved in and out by the operating system.
In other words, the fundamental thing that we are trying to get over here is to be familiar with creating and using Docker Volumes and separate out the container lifecycle from the data. Ideally, we want to keep these separate so that the data generated is not destroyed or tied to the container lifecycle and can thus be reused. This is done via Volumes, which we will be showing your in this post.
Prerequisites:
The basic requirements needed in working with Docker Data Volumes is an up to date Ubuntu 14.04 server, a non-root sudo user with Docker package installed on it. You can follow our previous article on how to download and install Docker on Ubuntu 14.04 in detail. Simply login to your Ubuntu server and run the command below to install Docker on Ubuntu.
$ wget -qO- https://get.docker.com/ | sh
After installing Docker, run the command below. Allow your current user to the Docker group.
$ sudo usermod -aG docker $(whoami)
Why Docker Data Volumes:
Containers are only short term and once a container is removed, it is gone. So, if you want your applications running inside the container to write to some files/data and then ensure that the data is still present. For e.g. let’s say you are running an application that is generating data and it creates files or writes to a database and so on. Now, even if the container is removed and in the future you launch another container, you would like that data to still be there. In that case we strongly need the Docker Data Volumes to keep the data persistent.
Working Without Docker Data Volumes:
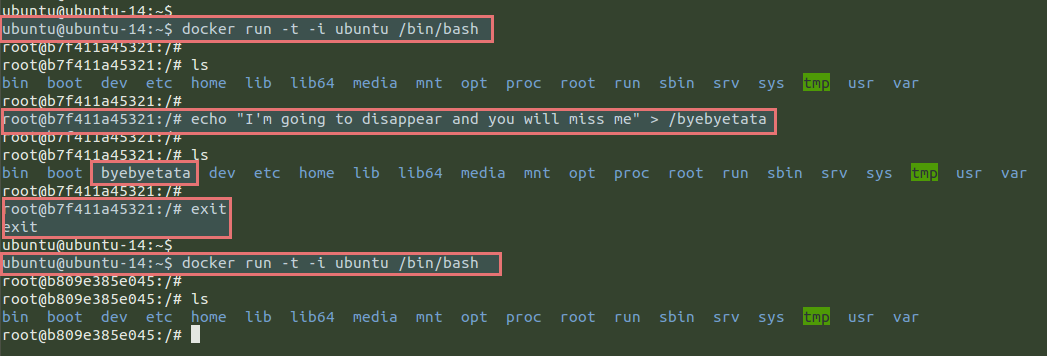
Let’s follow a practical example of working without a Docker data volume on Ubuntu that will show you how files will be destroyed after installing a new container.
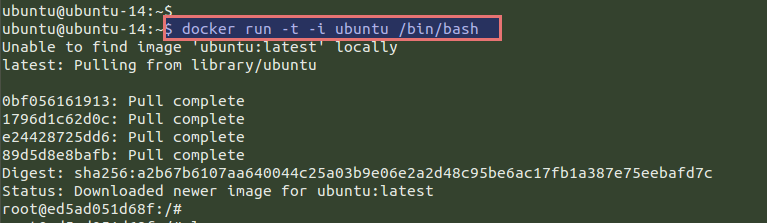
Run the command as given below to download and run an Ubuntu image in interactive mode with a terminal from the Docker Registry that will be launching the standard ‘bash’ shell of Ubuntu container inside it as shown in the image.
$ docker run -t -i ubuntu /bin/bash
Create a test file with some random text in it. Execute the exit command in your current shell. You will be returned back to your original shell as shown below. Then repeat the commands to see if the file you created has disappeared.
Types of Docker Data Volume:
Docker data volumes can used in the following scenarios, where the first one is keeping your data persistent even though the container gets restarted. You just want the data to hang around even if you shut down or restart the container. So it is often best to let Docker manage where the data gets stored.
In the second scenario, we will be sharing the data between the host filesystem and the Docker container. The third, and last type of using the Docker data volume, you can share the data with other Docker containers.
1- Persistent Data Container:
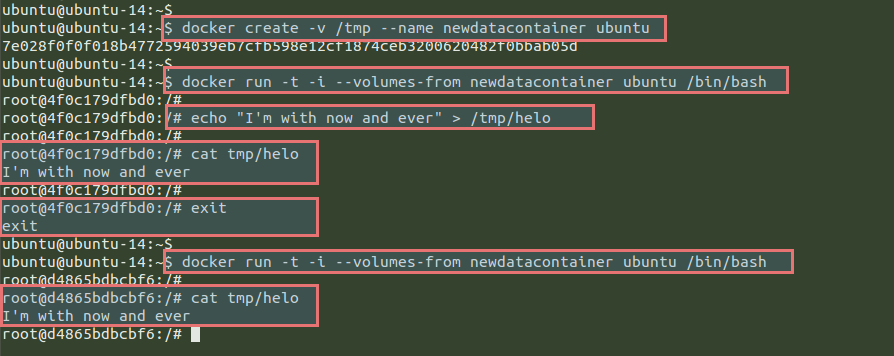
Here we will be showing you an example of keeping your data persistent using the Docker data volume. So, let’s create a new data container to store your volume within your ‘/tmp’ directory using the command below.
$ docker create -v /tmp --name newdatacontainer ubuntu
Now start your Ubuntu image by choosing the volume from your newly created data container.
ubuntu@ubuntu-14:~$ docker run -t -i --volumes-from newdatacontainer ubuntu /bin/bash
Create a new file within your ‘/tmp’ directory, exit your session and then repeat the commands to check if your file is there.
root@4f0c179dfbd0:/# echo "I'm with now and ever" > /tmp/helo
2- Sharing Data Between Host and Docker Container:
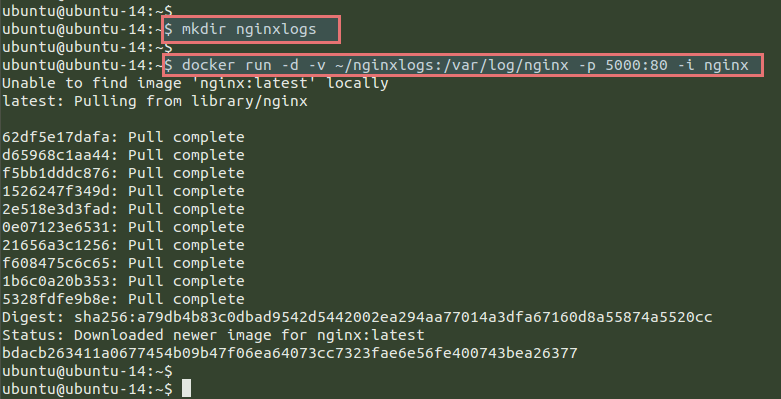
Here we are going to show how you can use your Docker data volume by sharing data between the host filesystem and the Docker container . Let’s take an example of running a Nginx Docker image using the command shown below.
Ubuntu@ubuntu-14:~$ docker run -d -v ~/nginxlogs:/var/log/nginx -p 5000:80 -i nginx
Here in this Docker command we have used ‘-d’ option to run the process in the background, ‘-v’ to indicate a volume that links the /var/log/nginx directory from inside the Nginx container to the ~/nginxlogs directory on the host server. The Nginx container listens to port 80 by default so we need to map the Nginx container’s port 80 to port 5000 using the ‘-p’ parameter in the command with addition to ‘-i’ for identifying the image name.
Now we have Nginx Docker image running on our Ubuntu server. Let’s access it whether from your web browser or run the ‘curl’ command below on your command line interface.
Then view the access log file. You will see the log entries of your recent access to the URL in the file as shown below.
ubuntu@ubuntu-14:~$ cat nginxlogs/access.log

Conclusion:
In this article you have learned about working with Docker data volume on Ubuntu 14.04. You have learned how Docker data volumes provide you with a separate place to store other data and how Docker containers allow you to run a pre-packaged “Linux box” inside a container. Now you’ve learned a bit more about how to use and work on Docker. Let’s keep on going and enjoying Docker’s world.
Would you like to know about Zuul, a CI/CD project gating tool? Download our white paper and get reading!