Symfony is a PHP full-stack web framework and an open source community-driven project built on top of the Symfony Components to create websites and web applications. It is written with speed and flexibility in mind that will allow developers to build better and easily maintain their websites with PHP. Symfony can be used to develop all kind of websites, from your personal blog to high traffic websites like Yahoo!Answers or Dailymotion.
Symfony can run on Windows, Linux or Mac; it can use Apache or Nginx and MySQL, or few other database engine at the backend. This article is about deployment of Symfony on Ubuntu 14.04 using LEMP or LAMP stack (Linux Apache MySQL PHP). We will be using MySQL and Apache Web server in this guide.
Basic Requirements
In order to deploy Symfony on Ubuntu 14.04, we need a non root sudo user to login and perform all system level tasks on Ubuntu 14.04 instance. Let’s connect to your server using ssh or open its CLI to perform basic OS settings.
Host Name Setup
To configure your system localhost entry, run the command as shown below.
$ sudo hostnamectl set-hostname ubuntu
$ sudo vim /etc/hosts
16.25.54.79 ubuntu ubuntu.vexxhost.com
System Update
After setting up the network and hostname on your server, run the command below to update your Operating System with the latest update and security patches.
$ sudo apt-get update
Installing Packages
We need to install some basic packages that are necessary for the installation of Symfony. Run the following command to install those dependent packages on your Ubuntu 14 server as shown.
$ sudo apt-get install php5 php5-cli php5-curl php5-xdebug php5-intl git acl
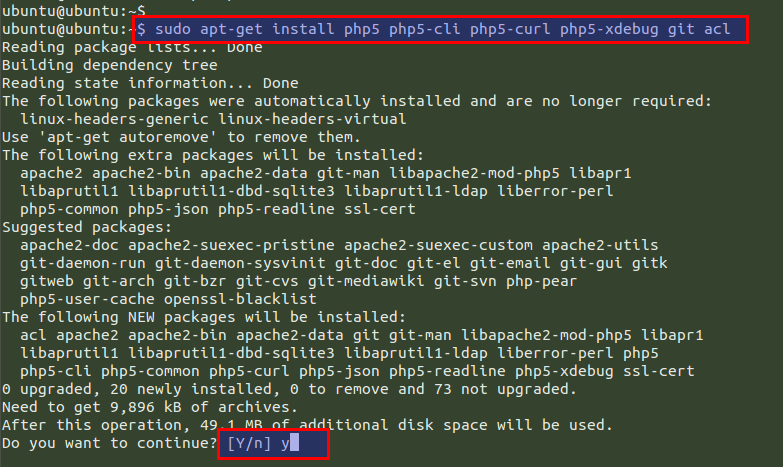
Press ‘Y’ key to continue. You will see that the mentioned packages are being installed including ‘acl’ to configure the right directory permissions while installing the application and some other PHP extensions . You can search for your required PHP extension by executing the below command and you will see a list of all its available package and their description.
$ sudo apt-cache search php5
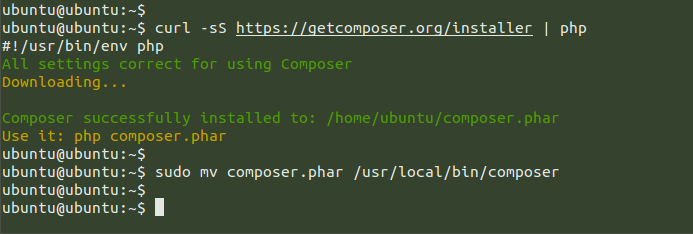
Installing Composer
Composer is a dependency manager for PHP that controls our library versions and their sources. We need this to download all dependencies required for Symfony. To install composer, we will be using the following ‘curl’ command to get it from the composer download page.
$ curl -sS https://getcomposer.org/installer | php
The composer package will be installed in your home directory and now we need to move it to the ‘/usr/local/bin’ directory using the following command.
$ sudo mv composer.phar /usr/local/bin/composer
LAMP Setup
After performing the basic OS operations, installing the required PHP extension and composer download, we are going to setup LAMP stack by using the MySQL and Apache Web Server. To do that, let’s follow the below instruction.
MySQL Database
To install MySQL database on your Ubuntu 14.04 server run the following command as shown below.
$ sudo apt-get install mysql-server
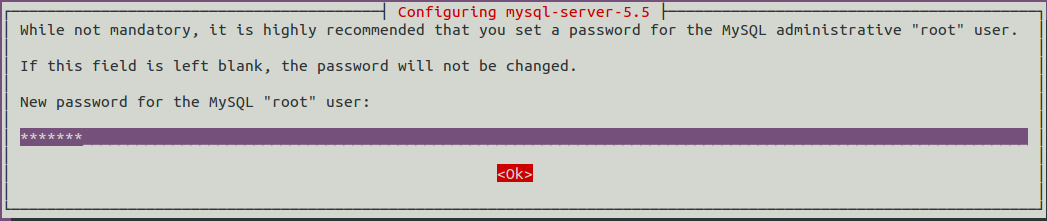
After configuring the root password, check the status of ‘mysql’ service then start running it using the below command.
$ sudo service mysql status
$ sudo service mysql start
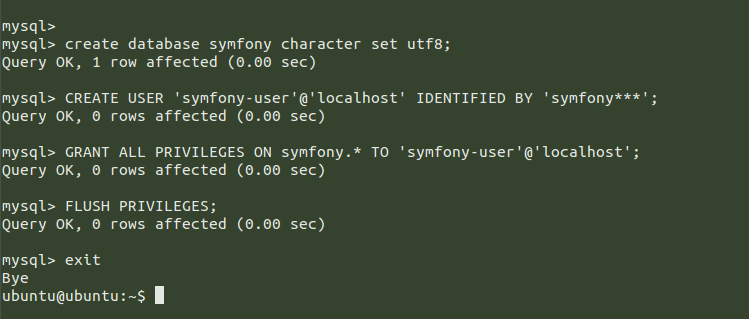
Now, connect to mysql database console using the root credentials that you configured earlier and create a new database and a user with special privileges assigned to it by running the below commands.
$ mysql -u root -p
mysql> create database symfony character set utf8;
 mysql> CREATE USER 'symfony-user'@'localhost' IDENTIFIED BY 'symfony***';
 mysql> GRANT ALL PRIVILEGES ON symfony.* TO 'symfony-user'@'localhost';
 mysql> FLUSH PRIVILEGES;
    mysql> exit
Application Code Check
Now we are going to use a basic demo application built with Symfony to check the application code with Symfony framework. Were going to use a simple test to-do list which allows you to add and remove items, and change each item’s status that will them be stored in a MySQL database.
To test our application code, we are going to use ‘Git’ . For this purpose, create a new directory within your web server’s document root directory. It will serve as an application root directory and later on used for web configuration.
$ sudo mkdir -p /var/www/test-symfony
Run the below command to change the owner to your non-root sudo user.
$ sudo chown ubuntu:ubuntu /var/www/test-symfony
Now change your directory to ‘/var/www/’ and run the ‘git’ command to clone demo application.
ubuntu@ubuntu:~$ cd /var/www/
$ git clone https://github.com/php-demos/todo-symfony.git test-symfony
Setup Permissions
After you clone the demo Symfony application, we need to assign it the web server’s user permission by using the ACL (Access Control Lists) for configuring the special permissions using the commands below.
$ sudo setfacl -R -m u:www-data:rx test-symfony/
By using the same process, we need to give read + write + execute permissions (rwx) to the user www-data in order to enable the web server to write only in the directories under ‘test-symfony’ folder as shown.
$ sudo setfacl -R -m u:www-data:rwx test-symfony/app/cache test-symfony/app/logs
If you want confirm the current permissions on the mentioned directory, then execute the following command.
$ getfacl test-symfony/app/cache
Setup Application
Now we will configure the Symfony application parameters and built this to work well across different environments. So we need to define an environment variable that tells Symfony we’re running the application on a production environment as by default it’s working in development environment.
$ export SYMFONY_ENV=prod

Then we need to install the project dependencies by accessing the application folder and running the below 'composer install' command.
$ cd test-symfony/
$ composer install --no-dev –optimize-autoloader
The installation and downloading process will take a while to complete. Once the process is done, you will be asked for some information required to populate into the ‘app/config/parameters.yml’ file which contains your database and smtp mailer information as shown in the image below.
To check the database connection settings, run the command below.
$ php app/console doctrine:schema:validate
Let’s search for this driver and then install it.
$ sudo apt-cache search pdo
$ sudo apt-get install php5-mysql
Installing the above extension will fix the PDO exception error . Then clear the cache and generate the application assets by executing the command below.
$ php app/console cache:clear --env=prod –no-debug
$ php app/console assetic:dump --env=prod –no-debug
Setup Web Server
Make sure that you have Apache web server installed and running. If not then you can install and start its services by using the following two commands.
$ sudo apt-get install apache2
$ sudo service apace2 start
Then we will configure the web server by setting up the ‘date.timezone’ directive in ‘php.ini’ file and updating the default website configuration file for serving our application.
$ sudo vim /etc/php5/apache2/php.ini
[Date]
; Defines the default timezone used by the date functions
; http://php.net/date.timezone
date.timezone = America/Toronto
After making the change, close the file by using ‘:wq!’ and restart ‘Apache2’ services.
$ sudo service apache2 restart

Now we will replace the default website configuration file with our customized Symfony application.  Let's take the backup of the original default file and create a new one to put the contents shown below.
$ sudo nano /etc/apache2/sites-available/000-default.conf
    DocumentRoot /var/www/test-symfony/web

        AllowOverride None
        Order Allow,Deny
        Allow from All


            Options -MultiViews
            RewriteEngine On
            RewriteCond %{REQUEST_FILENAME} !-f
            RewriteRule ^(.*)$ app.php [QSA,L]


ErrorLog /var/log/apache2/symfony_error.log
    CustomLog /var/log/apache2/symfony_access.log combined
Save the file and quit. To apply all the changes, you have to restart Apache services.
$ sudo apache2 restart
Now, open your web browser and give the FQDN or the IP address of your server.
http://your_servers_ip/
After that, you will be able to see the default web page of your Symfony PHP frame work where you can create your new projects.
Conclusion
At the end of this article, we assume that you are now able to deploy Symfony on your Ubuntu server by following this step by step guide with all commands used and snapshots for each step included. So, we can say that’s it! Well done. You have created a very minimum but functional CMS which can act as a good foundation for larger projects! Feel free to contact us here if you need further assistance or you face any kind of problem during its setup.
Would you like to know about Zuul, a CI/CD project gating tool? Download our white paper and get reading!