A high availability architecture is one of the key requirements for any Enterprise Deployment network. In this tutorial we will cover the build of a two-node high-availability cluster using the Corosync cluster engine, and the Pacemaker resource manager on Ubuntu 14.04 with a Floating IP to create a high availability (HA) server infrastructure on our Cloud Enviroment.
The Corosync Cluster Engine is an open source project derived from the OpenAIS project licensed under the new BSD License. It allows any number of servers to be part of the cluster using any number of fault-tolerant configurations (active/passive, active/active, N+1, etc.). Corosync effort is to develop, release, and support a community-defined, open source cluster executive for use by multiple open source and commercial cluster projects or products that provides messaging between servers within the same cluster.
Pacemaker is an open source high availability resource manager software used on computer clusters that manages the resources and applications on a node within the cluster. It implements several APIs for controlling resources, but its preferred API for this purpose is the Open Cluster Framework resource agent API.
How it works
We are going to setup the High Availability Cluster that will consist of two Ubuntu 14.04 servers accomplished with a Floating IP in active/passive configurations. The users will access the web services from the primary node unless any failure is detected by the pacemaker. In a situation when the Primary node fails the secondary node will become active using the script that will reassign the floating IP to the secondary node to serve the incoming traffic.
Prerequisites
In order to complete this article we need to build two nodes with Ubuntu 14.04 Operating System installed and setup their unique FQDN. Then we need a floating IP address to be assigned with any one node that will be used for the fail over.
We will follow the steps in the following sequence to setup the fully functional HAProxy on Ubuntu 14.04.
1 – Create 2 Ubuntu Nodes
2 – Create Floating IP to assign to one node.
3 – Install and configure Corosync
4 – Install and configure Pacemaker
5 – Configuration of Corosync Cluster
6 – Pacemaker Configuration
7 – Configure Nginx Cluster Resource
Step 1: Creating 2 Ubuntu Nodes
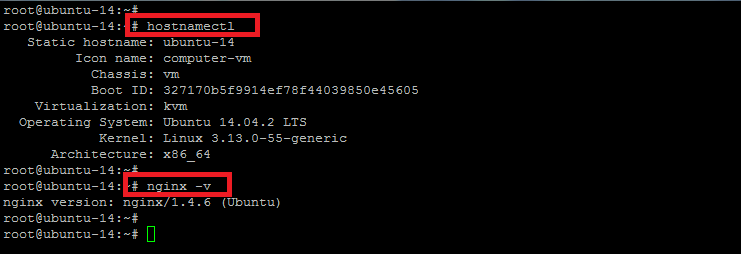
The first step is to create 2 separate Ubuntu nodes and configure their FQDN’s that represents them. Here we will be using ‘Ubuntu-14-P’ for our primary node and ‘Ubuntu-14-S’ for the secondary node. Make sure that on each node Private Networking option should be enabled. Now login to both your servers using the sudo user and run the following commands on both servers as a root to update your servers, install the Nginx web server and then configure the default web page with some test contents that represents the name of the current node.
#apt-get -y update
#apt-get -y install nginx
Now replace the contents of ‘index.html’ with your primary and secondry hostname and IP address which will be useful for testing which Node the Floating IP is pointing to at any given moment. You can do so by adding your host information using your editor.
#vim /usr/share/nginx/html/index.html

Save and close the configuration file and update the secondary node with its host name and IP address.
Step 2: Configure Floating IP
A Floating IP is an IP address that can be instantly moved from one Node to another Node in the same datacenter. So as the Part of a highly available infrastructure, we need to immediately point an IP address to a redundant server. You can generate your new floating IP from the cloud console and assign it the the Primary node.
Once you have assigned the floating IP to your Primary server, open your web browser followed by the Floating IP address. You will see the same contents by pointing the original IP address or the floating IP address.
http://your_floating_ip
You will see the following page after pointing the IP address of your server in the web browser.
Setup Time Synchronization
Time synchronization is important when you are working on setting up the clusters. In clusters each node have to communicate with the other node. Let’s run the following command on both the server nodes .
# dpkg-reconfigure tzdata
Select the same time on both servers and then update your servers followed by the installation of ‘ntp’ package by using the below commands.

After time zone setup run the command to update your system once again.
# apt-get update
# apt-get -y install ntp

Step 3: Installing Corosync and Pacemaker
Now we are going to install the Corosync and Pacemaker packages on both servers using the following command.
# apt-get install pacemaker
Corosync will be installed as a dependency of the pacemaker. Press ‘y’ key to continue the installation process.

Step 4: Corosync Configuration
After the installation is complete with required packages of corosync and pacemaker on both the nodes, we are going to configure the Corosync, So that both the servers can communicate as a cluster. So, in oder to allow nodes to join a cluster, Corosync requires that each node possesses an identical cluster authorization key.
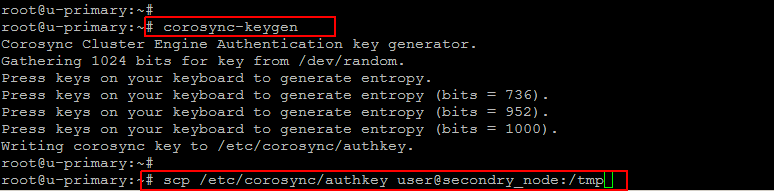
Let’s run the following command on the Primary node to install the ‘haged’ package so that we can easily increase the amount of entropy on our server required by the ‘corosync-keygen’ script
primary_node# apt-get install haveged
Then run the below command to generate a 128-byte cluster authorization key as shown.

Now copy the generated ‘authkey’ across to the secondary node using the ‘scp’ command as shown below.
primary_node# scp /etc/corosync/authkey user@secondry_node:/tmp
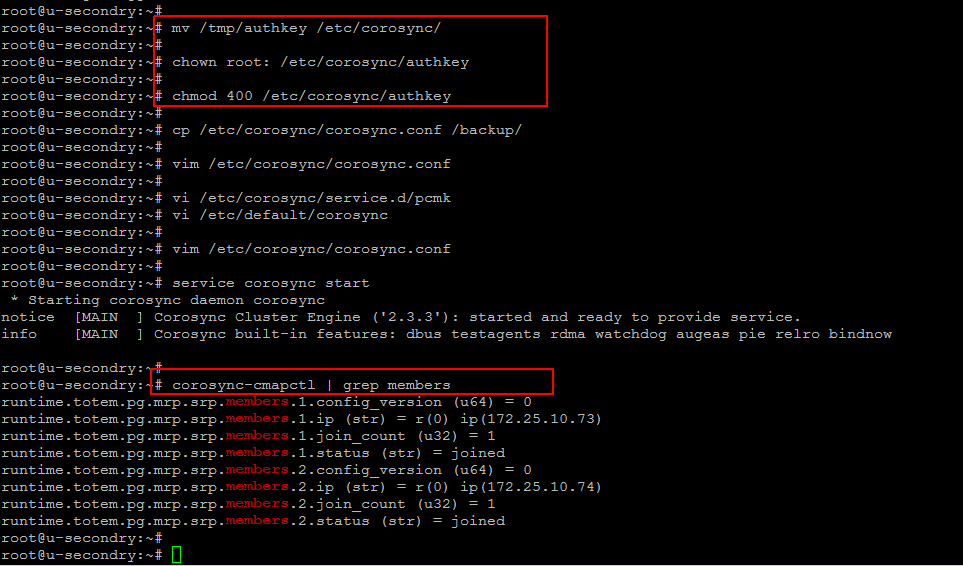
Then come the secondary node and place the ‘authkey’ file in a proper location with right permission using the following commands.
secondry_node# mv /tmp/authkey /etc/corosync/
secondry_node# chown root: /etc/corosync/authkey
secondry_node# chmod 400 /etc/corosync/authkey
Step 5: Configuration of Corosync Cluster
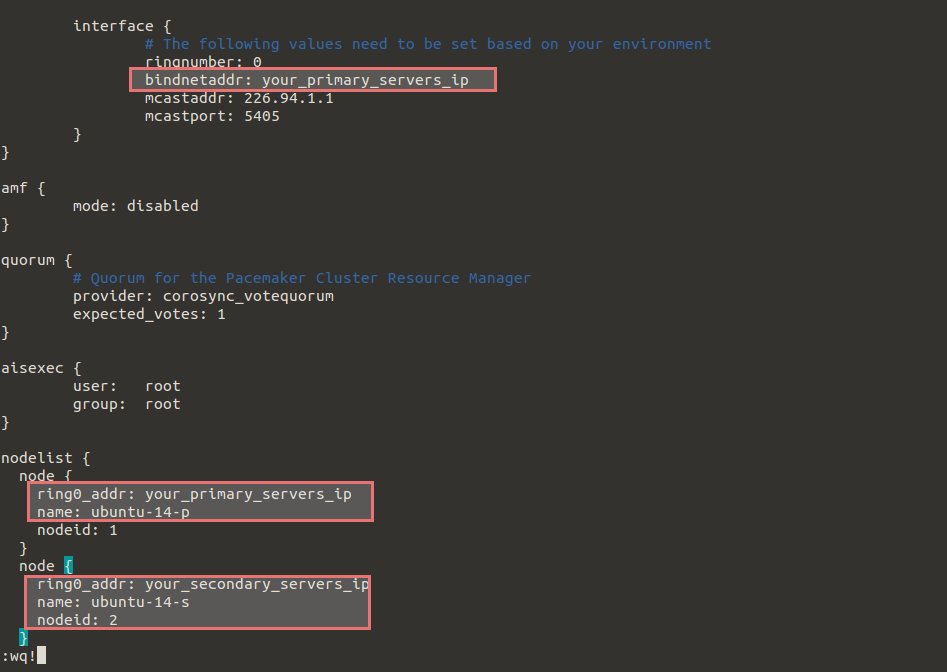
To get our desired cluster up and running, we must set up these configurations by opening the ‘corosync.conf’ with following parameters on both servers. So the configurations should be same on both servers.
# vim /etc/corosync/corosync.conf

totem {
        version: 2

        # How long before declaring a token lost (ms)
        token: 3000

        # How many token retransmits before forming a new configuration
        token_retransmits_before_loss_const: 10

        # How long to wait for join messages in the membership protocol (ms)
        join: 60

        # How long to wait for consensus to be achieved before starting a new round of membership configuration (ms)
        consensus: 3600

        # Turn off the virtual synchrony filter
        vsftype: none

        # Number of messages that may be sent by one processor on receipt of the token
        max_messages: 20

        # Limit generated nodeids to 31-bits (positive signed integers)
        clear_node_high_bit: yes

        # Disable encryption
        secauth: off

        # How many threads to use for encryption/decryption
        threads: 0

        # Optionally assign a fixed node id (integer)
        # nodeid: 1234

        # This specifies the mode of redundant ring, which may be none, active, or passive.
        rrp_mode: none
		interface {
                # The following values need to be set based on your environment
                ringnumber: 0
                bindnetaddr: primary_servers_ip
                mcastaddr: 226.94.1.1
                mcastport: 5405
        }
}

amf {
        mode: disabled
}

quorum {
        # Quorum for the Pacemaker Cluster Resource Manager
        provider: corosync_votequorum
        expected_votes: 1
}

aisexec {
        user:   root
        group:  root
}

nodelist {
  node {
    ring0_addr: primary_servers_ip
    name: ubuntu-14-p
    nodeid: 1
  }
  node {
    ring0_addr: secondry_servers_ip
    name: ubuntu-14-s
	nodeid: 2
  }
}
Save the file and then we need to configure Corosync to allow the Pacemaker service on both servers by creating a new ‘pcmk’file with following code that will be included in the Corosync configuration, and allows Pacemaker to use Corosync to communicate with our servers.
# vi /etc/corosync/service.d/pcmk

service {
  name: pacemaker
  ver: 1
}
Open the corosync file to enable its service at boot and then run the command to start its service on both the servers after saving the configuration file.
# vi /etc/default/corosync

# start corosync at boot [yes|no]
START=yes # service corosync start
Step 6: Pacemaker Configuration and Start-up
As we have done with the corosync, now we move forward to configure Pacemaker services and enable its starup priority level.
Run the following command to enable pacemaker startup with priority 20 because it must start after the corosync and the default priority of corosync is 19. So, here we will define its priority to 20 and then start its service as shown below.
# update-rc.d pacemaker defaults 20 01
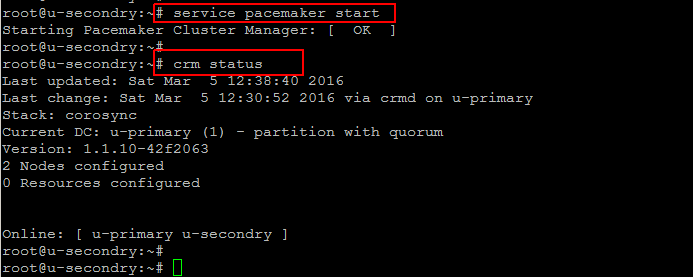
# service pacemaker start

Now check the status of Pacemaker using the CRM utility. Simply run the following command and it will show you the online state of both your nodes.
# crm status
Step 7: Adding NGINX Resource
We have successfully configured both nodes. Now we are going to add the Nginx resource as pacemaker comes with its default Nginx resource agent. So, we are going to make Nginx service highly available using the floating IP that we have configured. Let’s run the following command to create a new primitive cluster resource called “Nginx” as shown below.
# crm configure primitive Nginx ocf:heartbeat:nginx
params httpd="/usr/sbin/nginx"
op start timeout="40s" interval="0"
op monitor timeout="30s" interval="10s" on-fail="restart"
op stop timeout="60s" interval="0"
This will monitor the Nginx every 10 seconds, and restart it if it becomes unavailable. Then create a clone resource that specifies existing primitive resource to be started on multiple nodes by running the command as shown below.
# crm configure clone Nginx-clone Nginx
To create a colocation restraint called “FloatIP-Nginx” by using the following command.
# crm configure colocation FloatIP-Nginx inf: FloatIP Nginx-clone
This will create the ‘colocation’ resource and both of your servers will have Nginx running, while only one of them resource will be running with Floating IP. Now whenever Nginx services will stop on one server it will be migrated to the secondry node.
Let’s run the following command on the secondary node to check the crm status.
# crm configure show
# crm status

Conclusion
We are successful in setting up the basic High Availability setup using the Corosync, Pacemaker and a Floating IP address with two Ubuntu Nodes as a Primary and Secondary. Using the same scenario you can configure the HAProxy load balancers that will be configured to split traffic between two backend application servers. If the primary load balancer goes down, the Floating IP will be moved to the second load balancer automatically, allowing service to resume. You can use the same configuration method for any other application to setup high-availability.
Would you like to know about Zuul, a CI/CD project gating tool? Download our white paper & get reading!