HTTP supports the use of several authentication mechanisms to control access to pages and other resources. These mechanisms are all based around the use of the 401 status code and the WWW-Authenticate response header. HTTP authentication is the simplest technique for enforcing access controls to web resources because it does not require session identifiers, login pages and cookies. It uses a static HTTP header which means that no handshakes have to be done in anticipation.
So in this tutorial, we will show you the steps needed to set up HTTP Authentication on Ubuntu 14.04 LTS with Nginx.
Basic Requirements
In order to setup HTTP authentication with Nginx, you must have an installed operating system with Ubuntu and Nginx web server setup.
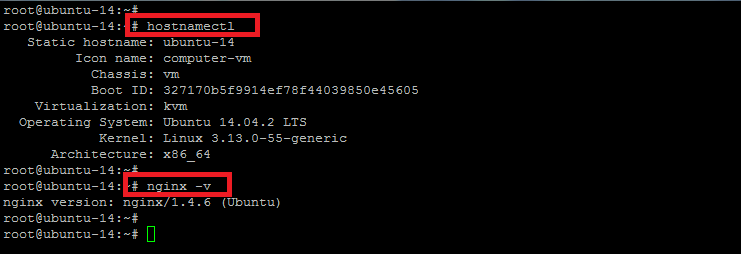
Here is the status of our base operating system and Nginx version where we are going to configure HTTP authentication in the next steps.
Installing Required Packages
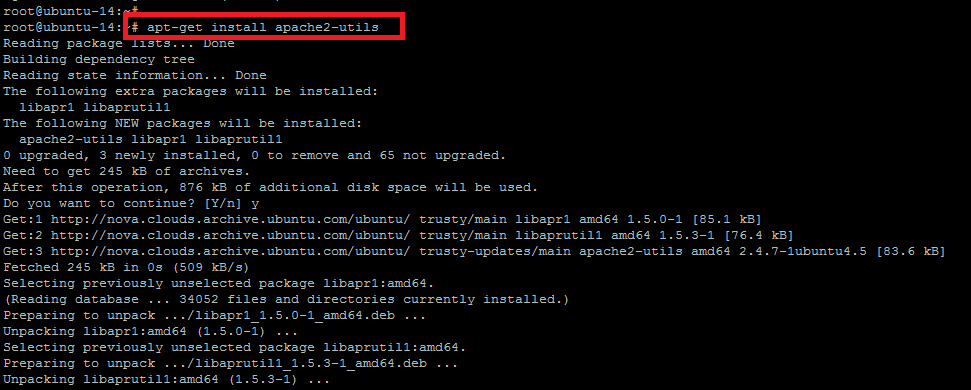
To set up HTTP Authentication for a directory, we will use the `htpasswd`command to create an encrypted user and password. So to make this command available, we have to install the following package for Ubuntu.
root@ubuntu-14:~# apt-get install apache2-utils
Once we have the package installed, we can confirm if it exists in the system or not with the help of `which` command as shown below.
root@ubuntu-14:~# which htpasswd

/usr/bin/htpasswd
Now, we can proceed with the creation of our `.htpasswd` file which will contain the information about the username and the password.
Creating User and Password
Here we will create a `.htpasswd` file under the document root directory of our virtual host or website being served by Nginx. Let’s run the following command that will create the file and add the user with an encrypted password.
root@ubuntu-14:~# htpasswd -c /etc/nginx/.htpasswd testuser

In the above command we can describe the used parameters where `/etc/nginx/` is the directory that we want to set for the authentication while `testuser` is the new user name that will be used for authentication purposes. So after executing the command, it will ask for the new password to set for the new user and that’s it! We’re done with the new user setup for our web directory.
Nginx Configurations Update
Now we will modify the Nginx configuration file to use the .htpasswd file. In our case, we will be using our virtual host’s Nginx configuration file located in `/etc/nginx/sites-available/` directory. Make sure that you are using the right configuration file as your domain config may have a different name.
Let’s open the virtual host conf file using any editor you are comfortable with.
root@ubuntu-14:~# vim /etc/nginx/sites-available/test.com
Press `i` for insertion mode and add the following two lines as required under the servers section.
auth_basic "Username and Password required";

auth_basic_user_file /etc/nginx/.htpasswd;
Press `Esc` key and type `:wq!` to save the changes in the configuration file of your virtual hosts file.
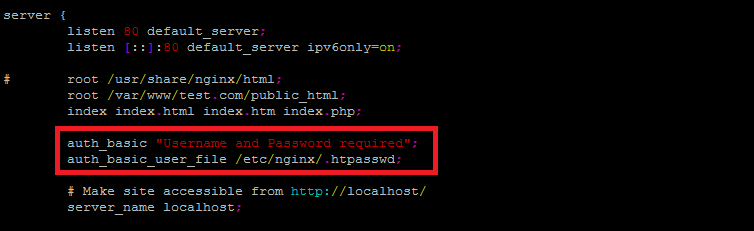
The first line defines the text that we will see in the login box when we access the folder using a web browser and the second one contains the path to our `.htpasswd` file where the username and the password is stored.
Restart Nginx
Now, to implement the changes on our test virtual host, reload or restart the nginx services and access the domain that has been secured using Basic HTTP Authentication.
root@ubuntu-14:~# service nginx restart

* Restarting nginx nginx
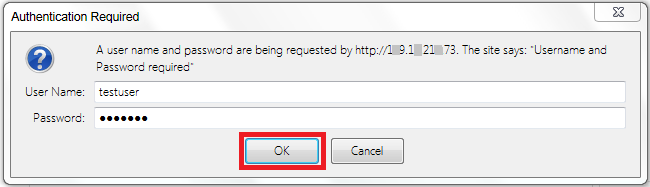
Secure Web Access
Access your website by providing your configured domain name or IP address or the domain path that you have secured and you will notice a browser prompt to enter the login and password as shown below. After providing the preconfigured username and password you will be able to see your web page.
http://your_domain_name/
Conclusion
Congratulations! Your http authentication has been configured successfully with Nginx. The basic authentication does offer maximum interoperability and downward compatibility. Any client (even a shell script with curl) could consume your service easily, as long as they have valid credentials.
Don’t forget to follow us on Twitter for news, updates and announcements – @vexxhost.
Would you like to know about Zuul, a CI/CD project gating tool? Download our white paper and get reading!