One of hottest topic in node.js is building realtime web applications. If you come from a C/C++/Java background, you will be amazed how surprisingly easy it is to quickly build out a realtime communication between browser client and server using node.js.
Today we will learn to do exactly that, using socket.io on top of the MEAN stack. By the end of this article you will have a functioning realtime communication in a MEAN stack app that notifies all connected clients about a certain event in realtime.
Before We Start:
We are going to use npm and mean.js. If you’re not already familiar with the MEAN stack or node.js, I suggest you take some time to catch up with this trendy and amazing platform for writing web applications.
You can quickly follow this tutorial here and get your environment setup for the following sections.
Installing socket.io:
Assuming you have already read the suggested article or have the mentioned packages installed on your machine, let’s fire up a terminal window and create a new Mean.js project by running the following command
$ mkdir awesome-realtime-app && cd $_
$ yo meanjs
The generator will ask you the following questions(I have included my answers below, feel free to write down yours instead). Make sure that you include the default article module though, we will bind our realtime feature with that module.
[?] What would you like to call your application? Awesome Realtime Application
[?] How would you describe your application? Full-Stack JavaScript with MongoDB, Express, AngularJS, and Node.js
[?] How would you describe your application in comma seperated key words? MongoDB, Express, AngularJS, Node.js
[?] What is your company/author name? VEXXHOST
[?] Would you like to generate the article example CRUD module? Yes
[?] Which AngularJS modules would you like to include? ngCookies, ngAnimate, ngTouch, ngSanitize
Now just run $ grunt and you should have the app running on your localhost through port 3000.
Let’s include the awesome socket.io module from npm in our app. Run $ npm install socket.io --save, this will install the package and add this in our package.json file.
Binding socket.io With Express:
To initiate the server side socket connection, we need to integrate it with express.js. Let’s start by opening up the file config/express.js in your favorite code editor and require the http and socket.io modules. I am adding this between line 6 and 7, right after the require of express –
var express = require('express'),
    http = require('http'),
    socketio = require('socket.io'),
    .......
Now, let’s tie it up with the app instance so that we can access it from anywhere in our app by taking advantage of the circular dependency of express.js. Go to the end of the file and add the following code right before the line where it reads return app;–
// Attach Socket.io
var server = http.createServer(app);
var io = socketio.listen(server);
app.set('socketio', io);
app.set('server', server);
We are simply instantiating socket.io here and attaching our express server with it in the first 2 lines. In the next two, we are storing the socket.io and the server instance in our app container.
Easy, right? awesome! Just one more thing, open the server.js file in the root directory and find where it reads app.listen(config.port); and replace it with app.get('server').listen(config.port);. This will make sure we don’t mess up our http server instance of express.
That’s all. Now we get to use it in our app. We will do something simple, we will notify all connected clients when a new article is created. To keep our code clean and easily maintainable, we can modularize the socket transmission and abstract it into a factory and there are many other techniques but for now we will just place it in our controller.
Open up the article server controller, open up the file app/controllers/articles.server.controller.js and find the create method. This method gets called when a new article is created. After the article is saved and there is no error we can notify everyone about it. So the following block of code goes inside the else block and right before res.jsonp(article); –
var socketio = req.app.get('socketio'); // tacke out socket instance from the app container
socketio.sockets.emit('article.created', article); // emit an event for all connected clients
This first parameter in the emit method is an event name and the second parameter is the data that will get sent along with the event. That’s all our server needs to do.
Connecting socket.io With Angular:
So far, we have implemented socket.io on the server but that doesn’t mean it already works on the browser. We need to do that separately. We need listen for server emitted events from the browser.
We will use the angular component for Socket.io built by btford. We can take advantage of bower for that. Running $ bower install angular-socket-io --save will install it and add it in our bower.json file.
Next we will to create an angular factory that will handle our websocket connection on the browser. Create a new file public/modules/core/services/socket.js and place the following code in it –
'use strict';

//socket factory that provides the socket service
angular.module('core').factory('Socket', ['socketFactory',
    function(socketFactory) {
        return socketFactory({
            prefix: '',
            ioSocket: io.connect('http://localhost:3000')
        });
    }
]);
We are making this a part of the core module since we will want to use it across our app. Now we can use this socket connection inside our angular app. We forgot two vital things though, injecting the dependency and include necessary javascript files on our webpage. Open up the file app/views/layout.server.view.html and add the following code before the closing </body> tag –
<!-- Socket.io -->
<script
    type="text/javascript"
    src="https://vexxhost.com/socket.io/socket.io.js"></script>
<script
    type="text/javascript"
        src="https://vexxhost.com/lib/angular-socket-io/socket.min.js"></script>
Next up, dependency injection; Open the file public/config.js and append 'btford.socket-io' at the of the list of dependencies array variable named – var applicationModuleVendorDependencies.
That’s it, now we have socket.io integrated with our angular app. But that’s just integration, let’s see if it works. Open up public/modules/articles/controllers/article.client.controller.js and on line 3 and 4 insert the Socket dependency. It should look something like –
angular.module('articles').controller('ArticlesController', ['$scope', '$stateParams', '$location', 'Socket', 'Authentication', 'Articles',
    function($scope, $stateParams, $location, Socket, Authentication, Articles) {
We just added the 'Socket' in the list of arrays and Socket in the list of function parameters. Now, place the following code inside the controller –
Socket.on('article.created', function(article) {
    console.log(article);
});
What’s happening here is, we are listening for the 'article.created' event through the socket and logging the article passed through the event in the console. To remind you, this is the event we emit when an article is created.
Checking Out What We Built:
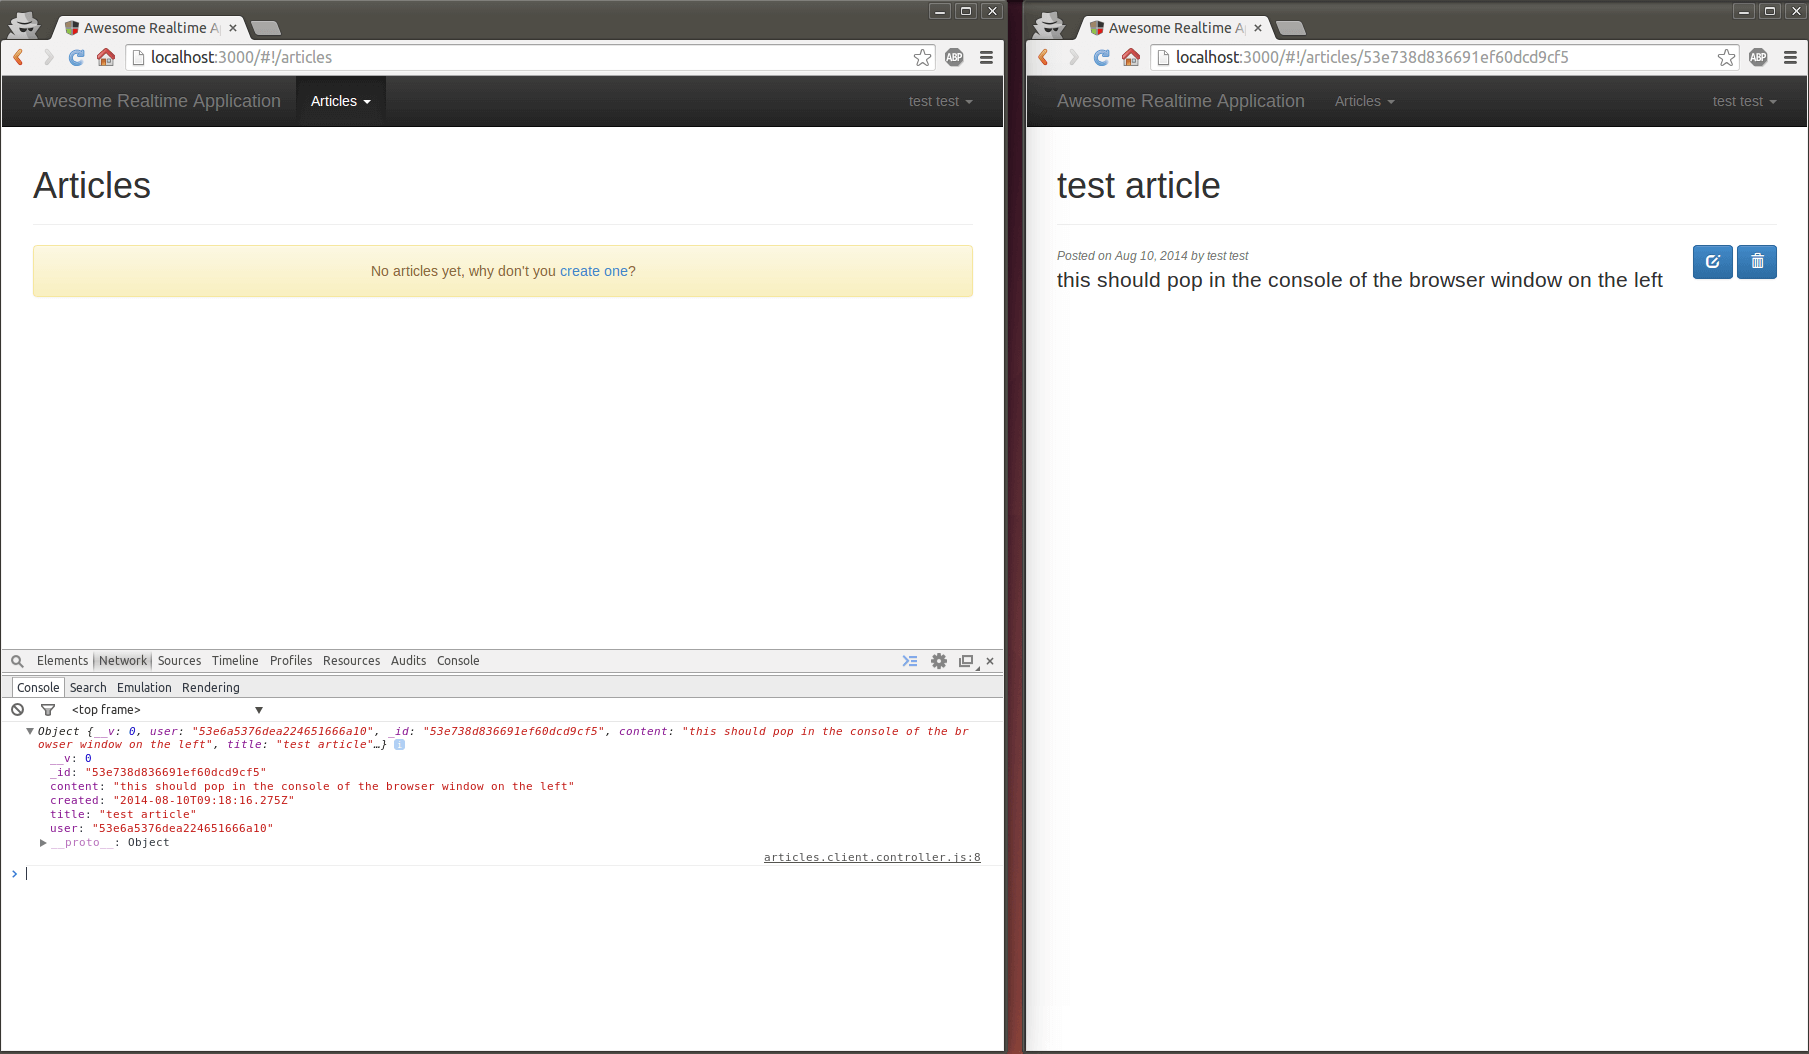
Let’s check if everything works as expected. Open up 2 browser windows and navigate to http://localhost:3000. Sign up with 2 user accounts. In one browser open up the console and navigate to the articles page in both. Now go ahead and create a new article in one browser and in the meantime, keep an eye on the console of the other. As soon as the article is created, you should see the article data in the console of the other browser! Magical! right?
I am showing my output in the images below –

Going Forward:
If you are javascript savvy, you can imagine the possibilities here. For example, you can hook onto this event and modify the dom to show notification to other users, increase articles counter on dashboard etc. If not, keep an eye towards our following posts here on VEXXHOST where we will be building amazing real time applications using this exact setup.
Would you like to know about Zuul, a CI/CD project gating tool? Download our white paper and get reading!